**Computer animation & processing**
# Computer animation
- Motion picture is an illusion of motion that is created by
showing a sequence of still images (called "frames") whose
successive images differ by a small amount.
- As long as the number of frames shown per second (fps) is large enough
the brain will perceive a smooth motion.
- In animation, each frame is sometimes created from many drawing steps.
In such a case, we can use the _double buffering_ technique
to make the animation feel smooth.
We use two canvases in double buffering.
One canvas is shown on the computer screen,
while the drawing commands are issued to the offscreen canvas.
When the offscreen drawing is finished,
the canvases are switched, and this process is repeated.
# Processing
- Processing was created at the Aesthetics & Computation group within MIT
Media Lab by Benjamin Fry and Casey Reas in the early 2000’s.
It is a java-based programming platform designed to be used by
artists who use computers to generate arts.
- In this course we will use processing only by calling its java library
from Kotlin. We will not use the rest of the features provided by the
processing software.
- The processing library provides capabilities including these
that we'll be using:
- drawing 2D and 3D graphics on the screen
- displaying the contents of graphics files on the screen
- animation
- saving images to files
- playing and manipulating audio signals & files
# Processing window
- The Processing library can be accessed through functions of the
`PApplet` class.
- A `PApplet` is a rectangular screen consisting of
addressable pixels, each of which is located by a pair of numbers ($x$, $y$).
- The artist works on this screen to make a `sketch`
by drawing shapes, displaying images, and performing other
manipulations to create an artwork.
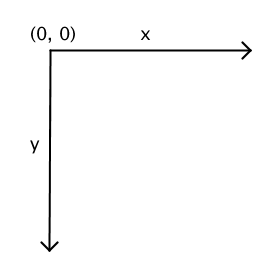
- The drawing screen uses a different coordinate system
than the Cartesian system you learned in Calculus.
The origin (0, 0) is the topmost left pixel of the screen.
The x-coordinate increases as we move right across the screen.
The y-coordinate increases as we move down the screen.
# Running a sketch
- The PApplet object can be executed via the function `runSketch()` or `main()`.
- The `runSketch()` by default works by first executing `settings()` once,
then executing `setup()` once, then loops forever executing the `draw()`
function at the rate specified by `frameRate`.
- The user can configure how the sketch is run. For example, she can
call the function `noLoop()` within `setup()` to disable looping.
Or she can call `frameRate()` to change the default (60 fps)
`frameRate` to some other value.
# Kotlin processing template
- Here is a template of a Kotlin program that calls the `main()`
function of the `PApplet` class to run the sketch `MySketch`:
```kotlin
import processing.core.PApplet
fun main(args: Array< String >) {
PApplet.main("MySketch");
}
class MySketch : PApplet() {
override fun settings() {
size(200, 200) // change the numbers to suit your application
}
override fun setup() {
// write your setup code here
}
override fun draw() {
// write your draw code here
}
}
```
# PApplet functions
- In `settings()` you can call functions that set up the screen
parameters only. Such functions are `size()`, `fullScreen()`,
`smooth()`, etc.
- In `setup()` you can call functions that create images, load images,
draw images, configure the colors, thickness, and style of various
things like screen background, fill colors, strokes, etc.
You can also control whether or not you want to do animation by
calling `loop()` or `noLoop()`.
- In `draw()` you can call the same functions as in `setup()`.
- There are a number of PApplet functions for detecting occurrences of
various keyboard and mouse events while running an animation.
However, these event-driven functions work only when you also
provide a `draw()` function, even if it were an empty one.
Event-driven functions include `keyPressed()`,
`keyReleased()`,
`keyTyped()`,
`mouseClicked()`,
`mouseDragged()`,
`mouseMoved()`,
`mousePressed()`,
`mouseReleased()`,
and `mouseWheel()`.
To customize your sketch so that it responds appropriately
to the events it's listening for, you override their respective
functions. For example, to customize `keyPressed()` you would write
```kotlin
override fun draw() {
// your code here (might even be empty)
}
override fun keyPressed() {
// your code here
}
```
# Example program
- This kotlin program draws 50 random figures on the screen.
Each figure is either a rectangle or a circle,
but its dimension, color, and position are randomly determined.
```kotlin
import processing.core.PApplet
const val HOW_MANY_FIGURES = 50
fun main() {
PApplet.main("RandomRectsCirclesSketch")
}
class RandomRectsCirclesSketch : PApplet() {
override fun settings() {
size(400, 400)
}
override fun setup() {
rectMode(CENTER)
noLoop()
}
override fun draw() {
repeat(HOW_MANY_FIGURES) {
val x = random(1F, width.toFloat())
val y = random(1F, height.toFloat())
fill(random(256F), random(256F), random(256F))
if (random(2F) < 1F) {
val size = random(10F, 60F)
ellipse(x, y, size, size)
} else {
val w = random(10F, 60F)
val h = random(10F, 60F)
rect(x, y, w, h)
}
}
}
}
```
# An example program's output
- This is an example of what you could get from running the program.
Of course, you will not get exactly this image because the program
creates a random image.

# Running the example program
- First, download the file [RandomFigures.zip](https://homepages.gac.edu/~sskulrat/Classes/2023F-178/code/RandomFigures.zip) and save it under your `~/Downloads` directory.
- Now, in the terminal, cd to your `mcs178` directory and type
```bash
unzip ~/Downloads/RandomFigures.zip
```
This will create a gradle project directory named `RamdomFigures`
in your `mcs178` directory.
- Now, cd into the `RandomFigures` directory and type
```bash
gradle -q run
```
The first time you run gradle it will take quite a while, but in
the end you will get an image similar to the one above.
_---San Skulrattanakulchai_